Announcement

Collapse
No announcement yet.

The Moon, with its colours enhanced...

Collapse
X
 
  • Filter
  • Time
  • Show
Clear All
new posts

    #16
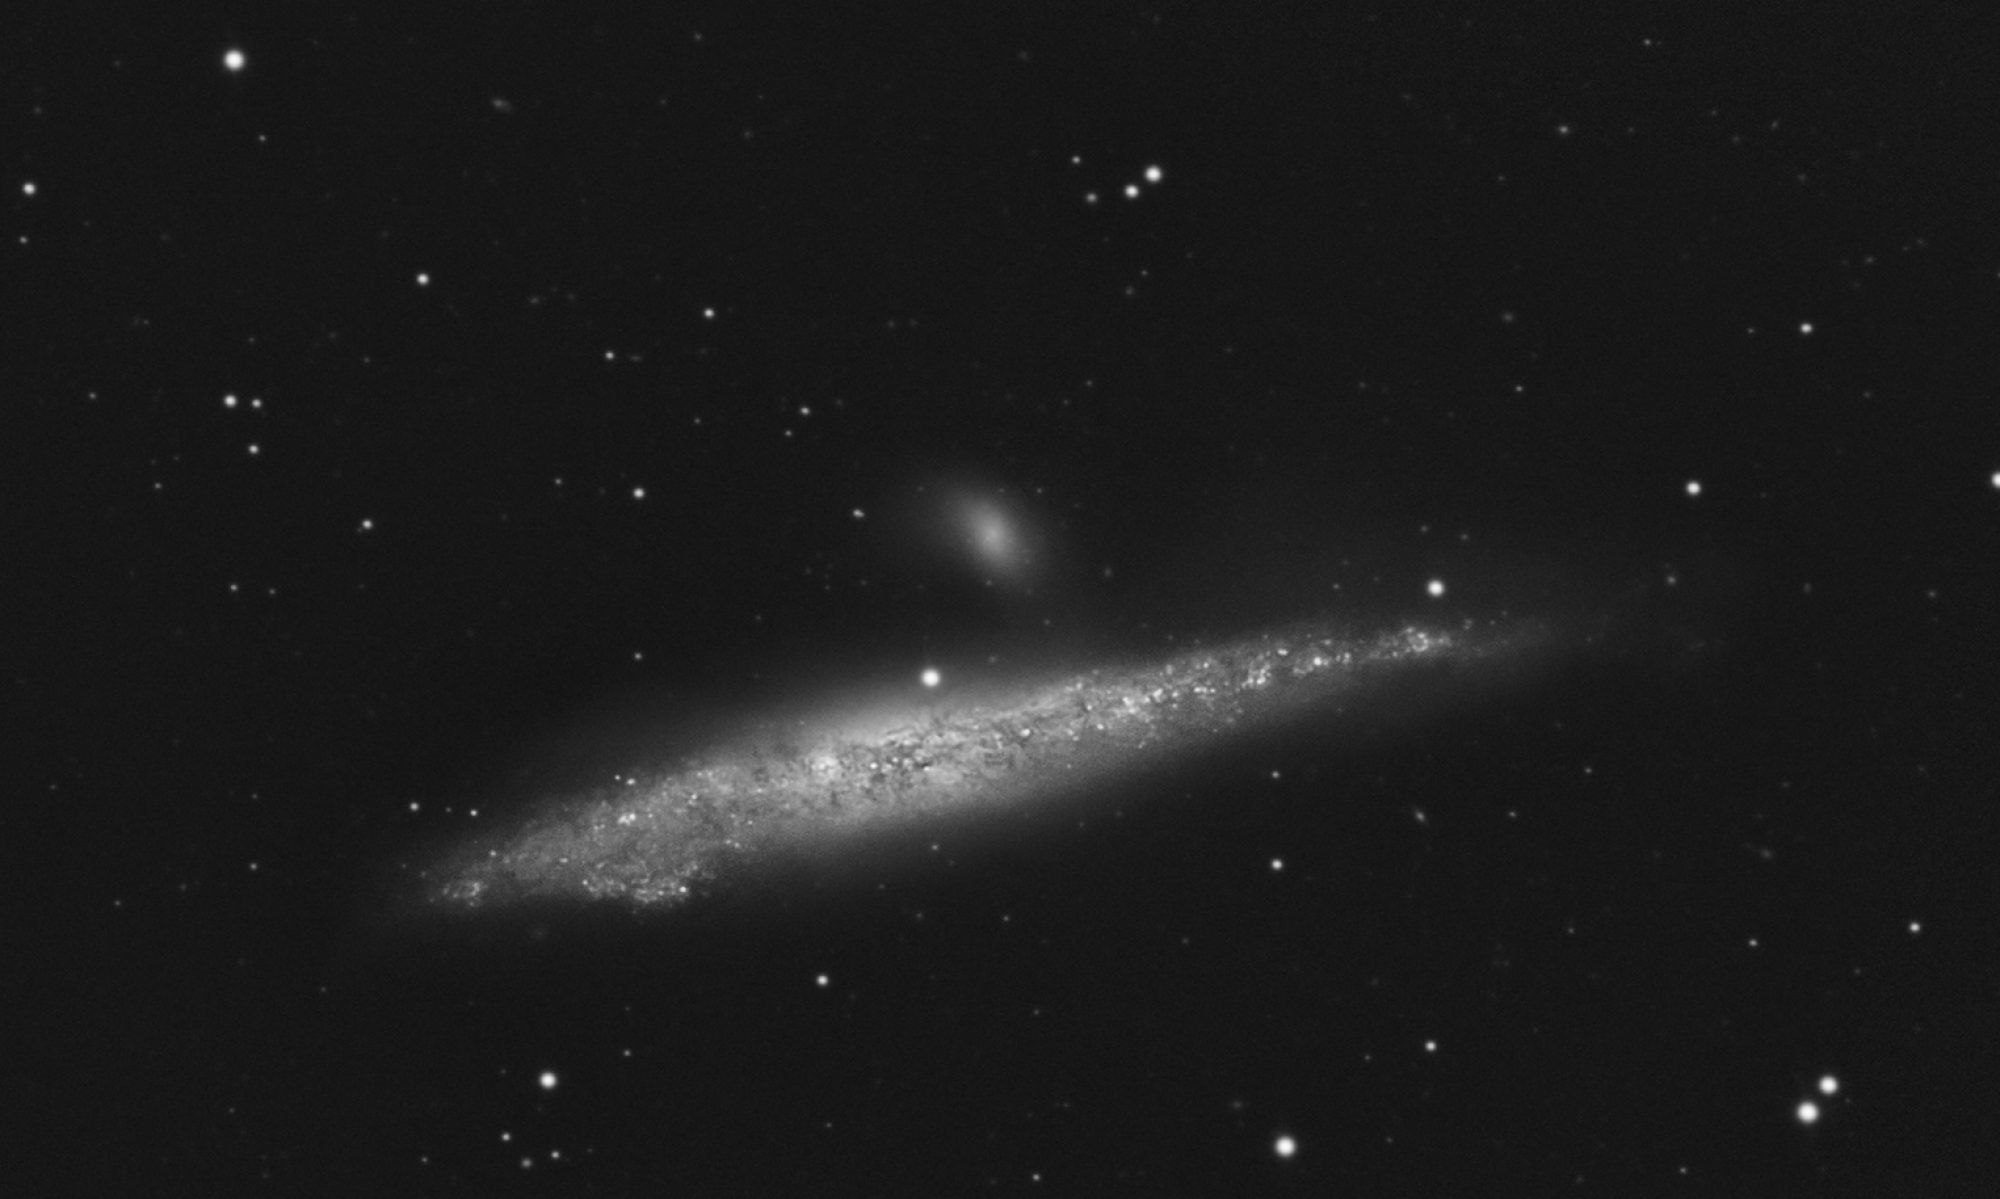
    I have a bonus note 4 due to a comment about clipping on an Astronomy forum...

    (4) Using "Auto Colour" in Note 2 can lead to clipping of the levels. However I've left it in as I think it's a quick way to a visually pleasing image (I actually borrowed that step from a YouTube video). People who are experienced in Photoshop might like to substitute other techniques at that point (levels, curves, etc.). Or you can manually do Auto Colour with clipping control this way:
    Select Menu->Adjustment->Curves (you can also do this in levels, note you need the image layer selected)
    Click "Options" (below "Auto", as it sets what Auto does)
    Select "Find Light and Dark Colours" (this is actually what Auto Colours does, except we get more control here)
    Tick “Snap Neutral Midtones”
    Change the two Clip values to 0.01 if you are okay with some clipping, or to 0 if not (0.01 is the minimum allowed value)
    Optionally Select "Save as Defaults" and remember that Auto in Curves is now Auto Colour!!!
    Select Okay
    Click on the very top right of the graph, Output: and Input: boxes should show 255
    Click "Show Clipping" and look at the image (you may need to move the dialog box) to see if you are okay with that much clipping, if not go change the settings
    Select Okay
    P.S. To see clipping in the main editing Window add a levels layer and drag the marker at the rightmost end with Alt held down.
    P.P.S. The other Auto options you can select are:
    "Enhance Monochrome Contrast" = Auto Contrast
    "Enhance Per Channel Contrast" = Auto Levels

    Comment


      #17
      Very impressive!!!
      John Liddle

      Backwell, North Somerset - "Where the cider apples grow"

      Comment


        #18
        BTW I also wrote this (well, something very similar) for another forum, talking about getting it all put together...

        So I bought a 2" to T2 adaptor and a T2 to Canon EOS adaptor from China for under seven quid the pair. Then used them to connect my 5Dsr to my 92mm (612mm focal length) Telescope. Basically it's a tube that you push into the hole at the back of a Telescope (or Telescope accessory, so wherever you'd normally fit an eyepiece) with T2 threads at the other end. Plus an adaptor from T2 to Canon EF, all bought as one item on eBay for £6.73 inc postage from China. It came pleasantly quickly compared to a lot of stuff from China.

        Using T2 adaptors is very common with Telescopes, and has been for as long as I can remember. I bought one for a previous Telescope, to Canon FD, back when I was in my 20s - actually that's a thought, I have a FD to m43 adaptor, hmmm - GH5 time? Although that Telescope needs pulling apart and cleaning, and I'm working my way up to that, as I think need to be at the top of my game that day.

        I will also point out the T2-EOS adaptor I bought ("2inch/50.8mm Ultra Wide Telescope Camera Adapter M42*0.75mm Thread for Canon") is made of two pre-assembled pieces (not including the tube to fit into the Telescope, which came in a separate box) and the one I got had the centre part (with T2 female threads) rotating freely in the outer part with the Canon EF connector. After a fair bit of trial and error I found a 1.5mm Allen key was the trick to tightening the three grub screws. There are lots of these sold on eBay and most look like the same OEM part.

        It's also important to point out that a lot of Telescopes have 1.25" holes in the end, not 2" as half mine do. Spotting scopes with interchangeable eyepieces can be different again.

        Oh and note the "Ultra Wide" part of the product description. Some T2 adaptors restrict the image circle and you can't use a FF camera without corner issues.

        I shot 20 images of the Moon using a photographic tripod, stacked the result and brought out the colour, as I'd never done that before and thought I'd like to see how it went.

        I used a Barlow (think teleconverter/extender) to crank up the magnification (maybe 3.5x more on the native 612mm focal length) and found I needed both a diagonal and an extension tube to get enough back focus (which was quite a surprise to me).

        Note this was just using the Telescope as effectively a large lens, I wasn't using a eyepiece and imaging its output (usually called "digiscoping").

        So I had:

        Scope-Barlow-Diagonal-2" Extension Tube-T2 wide adaptor-T2 to EOS adaptor-Camera

        It's a 2x Barlow, but in this configuration it will be maybe 3.5x (so 2200mm-ish, which works both ways as I think the image AFoV was about 0.9 degrees, based on Moon angular size of about 36/60 of a degree, so that and 3.5x come out similarly for focal length), hence ISO 1600 (@ 1/320th) as all the light got spread out. Oh and yes, that's 5 things between the scope and camera.

        I found focusing an issue as while I was using a big studio tripod the effective focal length was huge, as just mentioned (hence 1/320th to help with the movement). I used magnified live view but it was tricky. For terrestrial subjects I think using either no Barlow or the Barlow after the diagonal (for less magnification) would probably be a good idea for anything that isn't nailed in place.

        The Scope is basically a tube with three glass elements at one end and a hole at the other, which is a lot less than the 21 glass elements in my Canon 100-400... then again that zooms, auto-focuses and is stabilised.

        One other note is the Telescope inverts and L-R flips the image. Adding a diagonal to divert the image through 90 degrees only fixes half of that, so you need to remember to flip it in post. You can get image erectors for the Telescope, but I think the quality is better without them. Although for terrestrial use you'll want at least a diagonal to avoid upside-down images, which is just a pain to shoot/look at.

        I was extremely pleased with the result, I think it's the best Moon image I've come up with to date... despite the Moon being close to full and so showing less 3D detail via shadows. However for subjects you can't stack I think having the Barlow at 3.5x may well be a bit much, so possibly no Barlow is the way to go. I plan to experiment (but am limited to my back garden, of course).

        Also for photographing stars you'd probably want to add a field flattener at the rear of the Telescope to improve the image at the edges, once you'd had enough Wine to cope with the cost anyway. I'm still working on that and may not bother
        Last edited by DrJon; 09-04-2020, 15:19.

        Comment


          #19
          There have been a number of changes to my "Introduction to Moon stacking" step-by-step instructions since the original post in this thread, so I'll include the latest version as some stuff like a new link for AS3 and a setup change for the latest version really do need mentioning:

          (v1.07, 04 Oct 2020)
          This is just pretty much what I do when making a stacked Moon image, I'm not claiming to have any great insights, but I've tried to come up with a fairly simple (really!) and easy-to-follow guide on how you could try stacking if you're starting out. There are a squillion different ways to do it and if you've already got decent results some way or other this may not be of much use. That said here's a blow-by-blow workflow to make a stacked moon image...

          Sorry but this is quite long, but doesn't take that long to do (the manual parts that is, with a slow computer some processing steps may take a little while). Also I take no responsibility for any unsteadiness caused by following the Coffee/Wine drinking steps extensively...

          Oh and to start note that while the Full Moon looks amazing, but when the Moon isn't full the light coming in from an angle shows off the 3D nature of the Moon so much better (shadows being so important in Photography).

          Notes:
          * This only uses free software (except one optional extra step I've described doing in Photoshop).
          * I use Windows, if you are on Mac I'm sorry but I can't help so much, but see Note 5 below.
          * Shoot a number of well-exposed images using a tripod, as none of the stacking software currently available handles image rotation all that well.
          * Shoot in Raw (or Raw+JPEG if you prefer). Shoot at least 10 images, although more than 40 is better and more than a few hundred probably getting into diminishing returns. Shoot more if you plan to upscale the images before stacking (I got a decent result with a 200% scale and 60 Raws someone sent me, but that's probably the low end and the images were nice and clean).
          * I would suggest a shutter speed of 1/60th or more (1/100th at focal lengths over 600mm or for upscaling) to avoid Moon movement issues (greater still if the Tripod isn't that stable). Try to keep the ISO down.

          Okay, so here is my getting-started-with-stacking Guide:

          I would suggest using PIPP followed by Autostakkert3 (both free). Start from Raw Images. I will do a run and write as I go, so this is going to take me a long time to write and you much less to read :-)

          Workflow...

          Install PIPP (ideally the 64-bit one) from:
          Access Google Sites with a personal Google account or Google Workspace account (for business use).

          Download and unzip Autostakkert3 (ditto on 64-bit) to somewhere handy from here:
          Support Developing and supporting software is fun, but it also takes up a lot of time. If you like AutoStakkert!, and would like to support me in developing it, I present you with the option to give a (small) donation via Paypal.

          If you have issues a slightly older (3.0.14) version is available here (and I've used a lot):


          Start PIPP
          Use "Add Image files" (bottom left) to add the Raw files
          Choose raw images taken together on a tripod (to avoid image rotation, which stacking software doesn't handle that well)
          Expect a message about join mode when you exit the dialogue.
          Move the "Output Frame" Window that has appeared out of your way.
          Select the optimise options for Planetary box (bottom right).
          In the "Input Options" tab it will be okay leaving the Debayer Algorithm as Bilinear on slower computers (on the left below the "Debayer" checkbox, which should already be checked) but I'd go with AHD.
          In the "Processing Options" tab find "Centre Object in Frame" in mid-right and in the drop-down below it select the Moon's phase in the images. (If you don't see this did you forget to tick the "Planetary" option above?)
          On the same Tab "Enable Cropping" should be ticked.
          Pick X and Y sizes that cover the Moon plus as much as you'd like to see around it. Untick if it's very large in the image already... I just cropped what I wanted out of one of the JPEGs, saw the resulting size and rounded up. Leave the offsets at 0. The maximum size seems to be 5000x5000.
          Note at this point you can click "Test Options" in the top right to check it crops okay (then close the pop-up Window after checking).
          In the "Quality Options" tab I like to enable this but set a number to keep all the frames (the default should do this). Check "Reorder frames in Quality order" is ticked (it makes rejecting poor ones so much easier).
          In "the Output Options" tab choose TIF and tick "Include quality value in filename".
          In the "Do Processing" tab click "Start Processing." Coffee or Wine is good at this point. I'm going with the latter...
          You should now have a sub-directory in your original image directory and further a sub-directory of that containing a bunch of TIFF files with names like...
          00_5DR27739_quality_100%.tif
          01_5DR27742_quality_96.89%.tif
          etc.
          (Where 5DR27739, 5DR27742 are some of the original images.)
          Check they have the Moon centred and are cropped okay, else go back and try again.
          If they look quite dark tick "Stretch Histogram..." in "Processing Options" and try again (you can just start at the 75% default).
          Note extra PIPP runs will make a new output directory (leaving the previous one) as the directory names are time-stamped.
          If you have a lot of images (say 50+) and they look pretty good you can resize them at this point if you want a larger final image, e.g. by 200%. Just do it with a simple resizer, not a clever one that will make-up extra detail. I use the Lanczos option in Irfanview (free). Basically the bigger you want to go the more images you'll need (and they need to look good). I'd suggest sticking to 200% initially (or not at all on your early attempts at Stacking).

          When happy close PIPP and open AutoStakkert3 (ideally the 64-bit version, if your system supports it). This doesn't install, so just run it from its location.
          Click "1) Open", change "Files of Type" drop-down to "Image Files".
          Find and select all the TIFFs you just made (so click first and shift-Click last, or Ctrl-A with one selected, unless some have low quality scores, then ignore those) and click "Open". Another Window should appear, with a Moon image, move it out of the way for now.
          Click "2) Analyse".
          In the shiny new Window that recently appeared choose an AP size (e.g. 48) and click "Place AP Grid" on the left. If it looks like it covers the Moon well with reasonable sized boxes (it's to do image fine alignment, they are already very close from PIPP) then return to the main window, else try again.
          Note - if the Moon gets cropped on one edge (and wasn't in the source images) try expanding the size in the viewer window (top left).
          Check "sharpened" is ticked under "Stack Options" on the right side (this used to be the default but that seems to have changed since 3.0.14).
          Click "3) Stack" on bottom right...
          (Wine/Coffee time again ;-) )
          Now you should have two TIFF files in the directory above the TIF files PIPP made. Either pick the "*_conv.tif" one (which has some sharpening) or the other one and try sharpening it.
          Close AS3.
          You can stop here or look at notes 1 and 2 below...


          Extra notes:

          (1) You can enhance the output image using Registax Wavelets. I'd recommend this step. Here's a quick example:
          * Download and install Registax from http://www.astronomie.be/registax/download.html
          (Currently install 6.1.0.0 first, then install 6.1.0.8 afterwards.)
          * Run up Registax
          * Click select and open the stacked image, I'd choose the "_conv" one (Say Okay to the stretch intensity levels question)
          * Click on the Wavelet tab
          * Type something like 0.25 into the "Sharpen" box on Layer 1 on the left side.
          * Slide the slider below it somewhat to the right. Note it will be previewed in a square box in the image display, click in there to move it around (you may want to select/deselect "Show Full Image" while doing this). Optionally play with the denoise box too. Choose sharpening/denoising levels you like. Don't remove so much noise it just looks plastic (fairly smooth is okay)!
          * Click "Do All" (wait for it to get to 100%, it just leaves the progress bar full when done) then "Save Image", both at top left. Save as a 16-bit TIFF.

          (2) If you want to bring out the colour (not visible to the human eye without processing work) you can do it in Photoshop:
          * Load the final TIFF into Photoshop
          * Click menu entry Image->Auto Color (Note 4 talks about some alternatives to this step, but this is a good place to start)
          * Optionally duplicate the image layer (just to have an unsmoothed one for comparison, can be ignored, just hit Ctrl-J.)
          * Add a Hue/Saturation layer above the image layer(s)
          * Double click the magnifying glass icon to show the image at the pixel level and scroll to where one of the Seas is visible (may not be required for smaller images on higher-res displays).
          * Crank the saturation up until all the sea areas look very noisy (but not so far the colours get extreme).
          * Click to select the image layer (the copy if you have two)
          * Do menu Filter -> Noise -> Reduce Noise
          * Check Preview is ticked in the dialogue
          * Mine started in the Basic mode with settings 6-60-45-25 and "Remove JPEG artifact" unticked. You might want to start with something in the ballpark.
          * Slide the Strength slider until the noise in the seas becomes acceptable. Optionally play with the other settings. Don't go too far and check the detail is still good. Click OK.
          * Go back to the adjustment layer and tweak the Saturation
          * If the Moon now has too much false colour at the edges you might want to make a Black brush and paint around just the edge of the Moon on the Saturation layer's Mask. Possibly also elsewhere on the face with a reduced opacity (50% say) to tone down anything that looks too much.
          (Credit - a couple of the steps here, Auto-Colour and using Denoise, came from a video by "AstroFarsography".)

          Comment


            #20
            Ah, these bits were over the 10,000 character post limit, so this is Part 2, but Part 1 is all you really need if you run Windows:


            (3) You can't use the Drizzle option in AS3 as that needs frames that haven't been aligned by PIPP.

            (4) Using "Auto Colour" in Note 2 can lead to clipping of the levels. However I've left it in as I think it's a quick way to a visually pleasing image (I actually borrowed that step from a YouTube video). People who are experienced in Photoshop might like to substitute other techniques at that point (levels, curves, etc.). Or you can manually do Auto Colour with clipping control this way:
            Select Menu->Adjustment->Curves (you can also do this in levels, note you need the image layer selected)
            Click "Options" (below "Auto", as it sets what Auto does)
            Select "Find Light and Dark Colours" (this is actually what Auto Colours does, except we get more control here)
            Tick “Snap Neutral Midtones”
            Change the two Clip values to 0.01 if you are okay with some clipping, or to 0 if not (0.01 is the minimum allowed non-zero value)
            Optionally Select "Save as Defaults" and remember that Auto in Curves is now Auto Colour!!!
            Select Okay
            Click on the very top right of the graph, Output: and Input: boxes should show 255
            Click "Show Clipping" and look at the image (you may need to move the dialog box) to see if you are okay with that much clipping, if not go change the settings
            Select Okay
            P.S. To see clipping in the main editing Window add a levels layer and drag the marker at the rightmost end with Alt held down.
            P.P.S. The other Auto options you can select are:
            "Enhance Monochrome Contrast" = Auto Contrast
            "Enhance Per Channel Contrast" = Auto Levels
            P.P.P.S. Tom Glenn also suggests (in response to my post on "Cloudy Nights") an Auto-Colour alternative: "One very useful method for balancing colors, that is widely used by the planetary imagers here (and also works on the Moon), is to use Registax. Since you are already using Registax for sharpening, this will be easy for you to try. Click on the RGB Balance tab and then click 'Auto Balance'. Click "Do All" before saving." Although I haven't tried this yet.

            (5) If on linux or Mac OS X you could try using Wine to get the tools working. I haven't done this, but if you are working that way here's what I've discovered:

            PIPP specifically has a Wine package.
            Access Google Sites with a personal Google account or Google Workspace account (for business use).


            Autostakkert3 says:
            "AutoStakkert! is Windows only software. However, it does run fine using Wine under both Linux and macOS."

            Registax has a package aimed at Wine on Linux, so may work, but it is just one way to sharpen. I'd think it would be in with a good chance.


            For Photoshop on linux you're on your own... :-)

            Here's a link on using Wine on a Mac:
            Wine is an open source program for running Windows software on non-Windows operating systems.

            Comment


              #21
              Fantastic image, and thank you for the detailed processing steps

              Comment


                #22
                Just a wow from me!
                The process looks fascinating - thanks for posting.
                Bob


                EOS 6D mkII, EOS 6D, BG-E13 Grip, EOS 30 (Film), EOS M5, EF-M 22mm f2.0, EF-M 18-150mm, 35mm f2.0 IS, 50mm f1.8 STM, 17-40 f4 L, 24-105 f4 L IS, 70-200f4 L IS, 430EX II, 270EX II, Manfrotto 190XDB +496RC2 tripod, Op Tech straps & Think Tank bags.

                Comment

                Working...
                X