Announcement

Collapse
No announcement yet.

Kaleidoscope patterns from smoke

Collapse
X
 
  • Filter
  • Time
  • Show
Clear All
new posts

    Kaleidoscope patterns from smoke

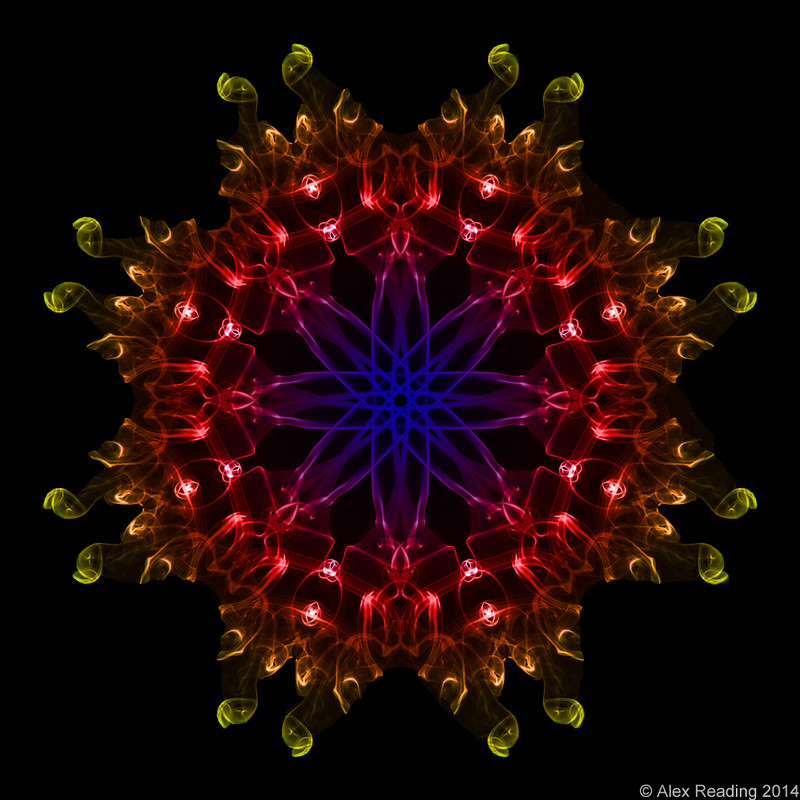
    Been playing around with one of my smoke shots, using it as an opportunity to teach myself about rotating and blending layers in Elements. I quite like the 3-D effect, although it was not intended at all:


    Smoke pattern by AlexR!, on Flickr

    Comments gratefully received, as always.
    Canon EOS 7D
    EF-S 10-22mm 1:3.5-4.5 USM, EF 24-105mm 1:4 L IS USM, EF 50mm 1:1.8, EF 70-300mm 1:4-5.6 IS USM
    Luminar 4, Aurora HDR Pro, Silver Efex
    flickr: http://flic.kr/ps/LXWuy

    #2
    Re: Kaleidoscope patterns from smoke

    I quite like that nice image.
    1Dmk2, Canon 70-200 f4 L Non-IS & a borrowed canon 28mm

    Flickr
    Facebook
    www.paulraybouldphotography.co.uk

    Comment


      #3
      Re: Kaleidoscope patterns from smoke

      Very effective, I think it may project better than it would print

      Comment


        #4
        Re: Kaleidoscope patterns from smoke

        Excellent work; I like that a lot...

        Cheers;

        Lee
        Cheers;
        Lee
        ---------------------------------------------------------------------------
        All fair comment & critique will always be welcomed !
        5D3, 80D, 40D (IR), G3X
        17-40 f/4, 24-105 f/4, 70-200 f/2.8, 100-400 f/4.5-5.6, 100 f/2.8 Macro, Sigma 150-600 Sport

        Comment


          #5
          Re: Kaleidoscope patterns from smoke

          Good Photoshop work well done

          Alan

          Comment


            #6
            Re: Kaleidoscope patterns from smoke

            Thats a good one Alex

            Stan
            Stan - LRPS, CPAGB, BPE2*

            http://neptuno-photography.foliopic.com/
            flickr

            Comment


              #7
              Re: Kaleidoscope patterns from smoke

              Paul, Muscat, Lee, Alan, Stan, thanks all.
              Canon EOS 7D
              EF-S 10-22mm 1:3.5-4.5 USM, EF 24-105mm 1:4 L IS USM, EF 50mm 1:1.8, EF 70-300mm 1:4-5.6 IS USM
              Luminar 4, Aurora HDR Pro, Silver Efex
              flickr: http://flic.kr/ps/LXWuy

              Comment


                #8
                Re: Kaleidoscope patterns from smoke

                I really like that effect Alex
                Canon EOS R6 Mark II, Canon RF 100-500mm f4.5-7.1L, Canon RF 24-105mm f4L
                Please note: I do not have or use Photoshop

                flickr

                Comment


                  #9
                  Re: Kaleidoscope patterns from smoke

                  Stephen, thanks for stopping by.
                  Canon EOS 7D
                  EF-S 10-22mm 1:3.5-4.5 USM, EF 24-105mm 1:4 L IS USM, EF 50mm 1:1.8, EF 70-300mm 1:4-5.6 IS USM
                  Luminar 4, Aurora HDR Pro, Silver Efex
                  flickr: http://flic.kr/ps/LXWuy

                  Comment


                    #10
                    Re: Kaleidoscope patterns from smoke

                    I like the colours that you've used.
                    Di ~ Trying to take "the" photograph.
                    Di's Flickr

                    Comment


                      #11
                      Re: Kaleidoscope patterns from smoke

                      Nicely done Alex, Raj
                      Raj
                      Flickr

                      Comment


                        #12
                        Re: Kaleidoscope patterns from smoke

                        Thanks, Di and Raj.
                        Canon EOS 7D
                        EF-S 10-22mm 1:3.5-4.5 USM, EF 24-105mm 1:4 L IS USM, EF 50mm 1:1.8, EF 70-300mm 1:4-5.6 IS USM
                        Luminar 4, Aurora HDR Pro, Silver Efex
                        flickr: http://flic.kr/ps/LXWuy

                        Comment


                          #13
                          Re: Kaleidoscope patterns from smoke

                          At the risk of boring you, on another forum that I occasionally frequent, I gave an explanation of my method, so as I'd gone to the effort I thought I'd do a quick copy and paste here. I didn’t initially post my method because I didn’t want to give the impression that it was some well crafted set of best practice that I had honed and refined over the years. In fact it was very much a learning curve and at every step I was googling to come up with a way of doing that next bit. But, caveated accordingly, for interest, but also for someone to suggest a better and more effective method, I have scribbled it down below. Note that I didn’t do every step quite as I have described below as there was a lot of to-ing and fro-ing as I tried things that failed, but this is how I’d do it if I was going to have another go.

                          All done in Photoshop Elements 11.
                          Firstly, I chose a smoke trail that was fairly simple and that only curved in one direction (this was just my artistic choice).
                          I processed it through Raw, making the blacks as black as I could and the whites as light.
                          I tidied the image to remove the ‘straggly’ bits at the top, by a mixture of large area selection which I turned to black, and then clone stamping.
                          I then cropped fairly close in to the remaining image.
                          I increased the size of the canvas to something like 10,000 pixels in both directions to give me room to move into and moved the image up to near the top middle of the canvas.
                          I stopped this being the background layer then created a new blank layer which I put at the bottom of the layer stack and made this into the background.
                          I created a layer copy of the image and changed the blend modes for both to ‘Lighten’. This took me ages. I had read that single, simple instruction in someone’s tutorial, but could find absolutely no reference to blend modes within PSE. Turns out it is simply the pull-down in the layer pallet that defaults to ‘Normal’. This was one of many ‘bang head on desk after shouting at screen’ moments. The help function in PSE is total rubbish. But I digress…
                          I chose one of the layers and did ‘Flip Layer Horizontal’, discovering that the single-Layer commands are listed on the pull-down below the main Flip and Rotate commands.
                          I then slid one of the layers sideways until I got a pleasing combination of an intertwined smoke trail. Note that holding down the shift key while dragging stops it moving vertically – a great top tip. I then highlighted these two layers and merged them into a single one which I moved back to top central.
                          I then copied this new layer 7 times to create a total of 8 image layers sitting on top of each other and one blank background layer. They should all have the blend mode ‘Lighten’.
                          Taking each layer in turn I applied a ‘Free Rotate’ to each to form the spokes. When Free Rotating you can define the point of rotation and the angle in the tool set at the bottom of the screen. I selected the bottom middle rotation point, and typed the amount of rotation I wanted into the angle box. PSE seemed to get confused by angles over 180, so I ended up using + and – values. I had chosen to go with 8 spokes, so entered +45, +90, +135, +180, -45, -90 and -135 but I had previously checked what it looked like with 6 spokes, i.e. 60, 120, 180 etc.
                          I merged the resultant 8 image layers into a single layer. I was then left with a single circular image but you could see all of the edges of the individual layers in an octagon so I coloured the background layer black.
                          I then clicked on the gradient filter, selecting blend mode of 'overlay', then ‘radial’ and the colours I wanted.
                          I then cropped the image into a square. I did this by eye using the standard grid, but there must be a better way of centring it.
                          I then saved it as a jpeg as this is my standard workflow. I did, however, notice that back in the Organiser it refused to display it because it was too large (66MB or so). This seemed excessive so I resized it down to 5,000 x 5,000 pixels.
                          I then did my standard resizing to 1024 and adding of copyright note that I do for images I post to the web.

                          Hope that all makes some sort of sense. I bet someone is now going to pop up and say it can all be done with a single click.
                          Last edited by AlexR!; 22-02-2014, 15:13.
                          Canon EOS 7D
                          EF-S 10-22mm 1:3.5-4.5 USM, EF 24-105mm 1:4 L IS USM, EF 50mm 1:1.8, EF 70-300mm 1:4-5.6 IS USM
                          Luminar 4, Aurora HDR Pro, Silver Efex
                          flickr: http://flic.kr/ps/LXWuy

                          Comment


                            #14
                            Re: Kaleidoscope patterns from smoke

                            A great image and explanation Alex
                            Chris
                            Practice makes perfect

                            Canon EOS 7D,1100D, EF 400mm f5.6L USM, EF 24-105 1:4 L IS USM, 18-55 Kit lens,EF 50mm 1.8, EF 100mm f2 USM, Tamron AF70-300mm f4-5.6 Di LD Macro 1:2

                            Comment


                              #15
                              Re: Kaleidoscope patterns from smoke

                              Well done on the explanation Alex, more of less how i created my smoke wheel, other than using CS3 rather than Elements.

                              you probably found it took a lot longer to explain than to do and i am glad no one asked for my method

                              Stan
                              Stan - LRPS, CPAGB, BPE2*

                              http://neptuno-photography.foliopic.com/
                              flickr

                              Comment

                              Working...
                              X